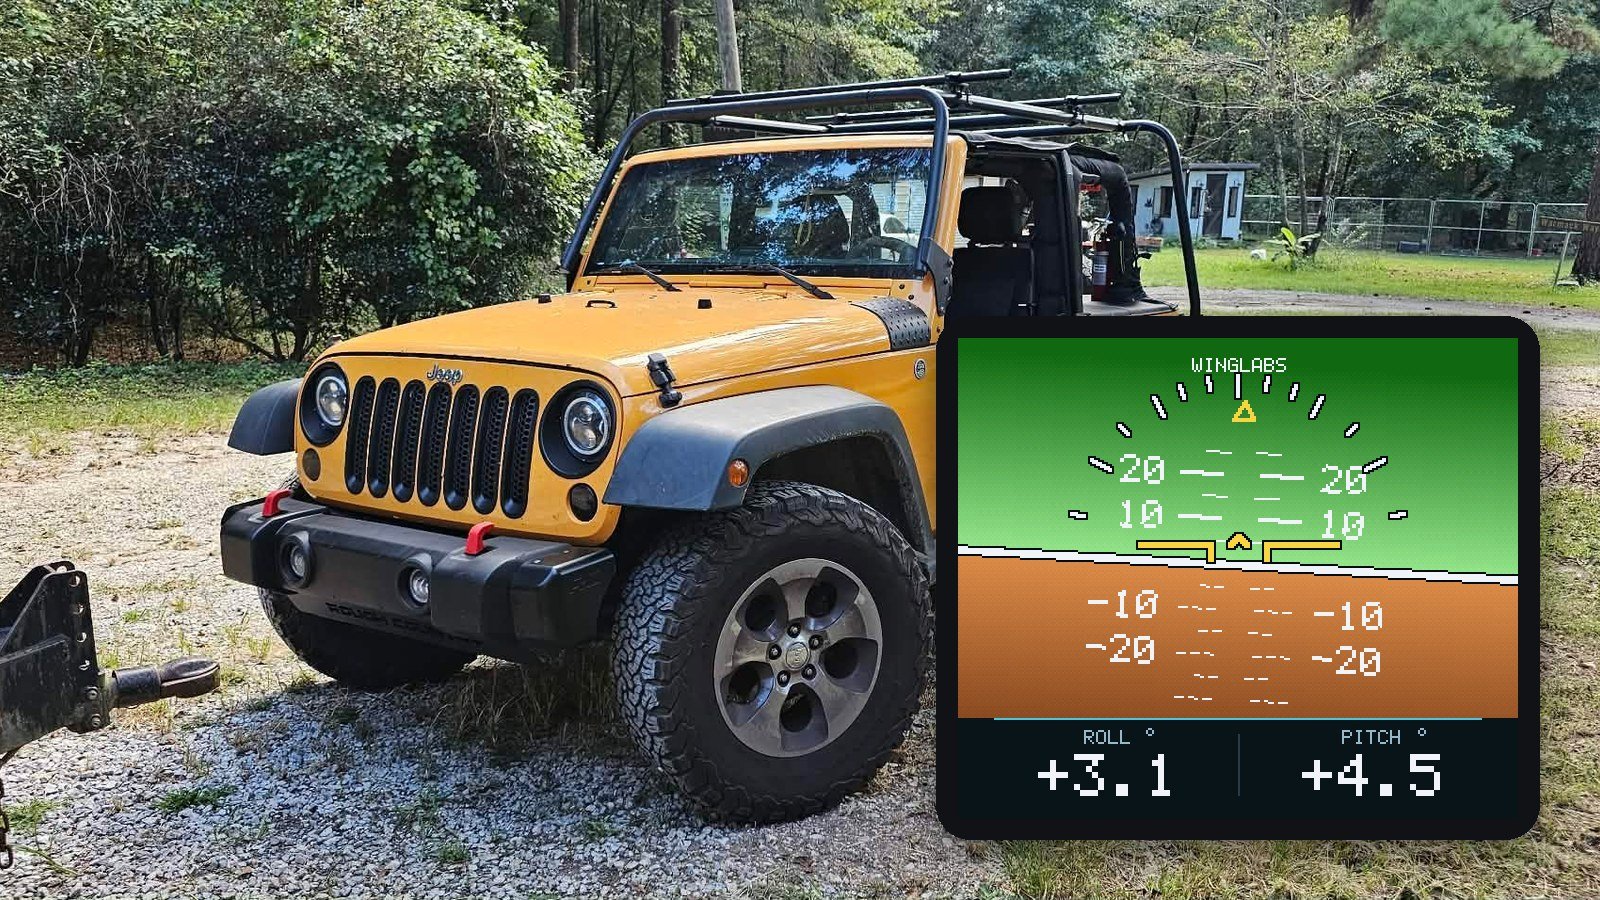
Model: WL-OR-H169 · Firmware: 1.9.0 · For off-road vehicles.
01 · Getting to know your inclinometer
A compact, full-colour inclinometer for your off-road vehicle. It shows in real time how far the vehicle leans to the side (roll) and how steeply it points up or down (pitch), from its own motion sensor. It needs no connection to the vehicle’s electronics other than USB power.
Reading the display
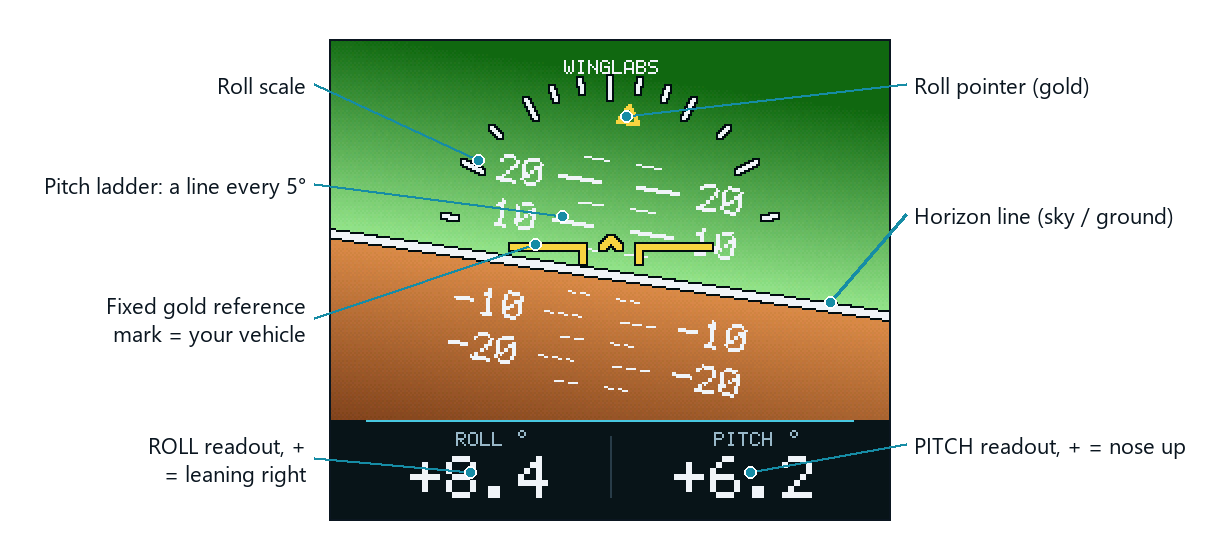
The gold reference mark in the centre is fixed and stands for your vehicle. The horizon, the pitch ladder and the gold pointer on the roll scale move around it, just as the real horizon would look through the windscreen:
- Roll (side tilt). The horizon tilts and the gold pointer moves along the roll scale at the top. The ROLL readout shows the angle in degrees: positive values mean the vehicle leans to the right (right side lower), negative values that it leans to the left.
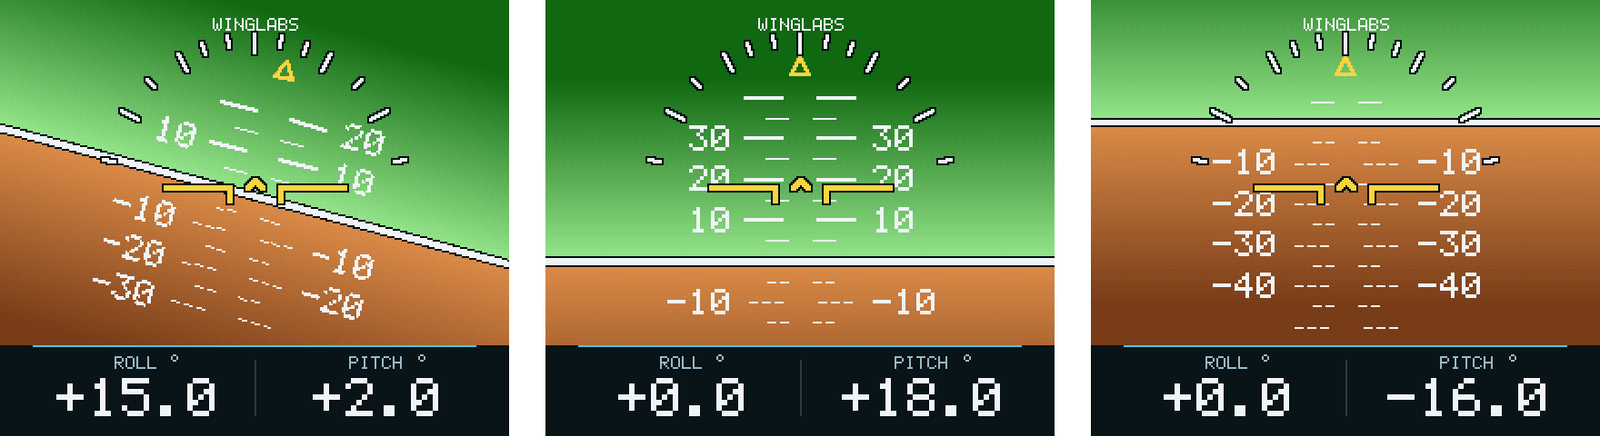
- Pitch (up or down). The horizon moves up or down behind the reference mark. Each ladder line is 5 degrees; numbered lines are every 10 degrees. Lines above the horizon are solid, lines below are dashed. The PITCH readout is positive when the nose points up (climbing) and negative when it points down (descending).
- Full range. Roll is shown all the way round, and pitch up to 90 degrees nose up or nose down.
Status indication
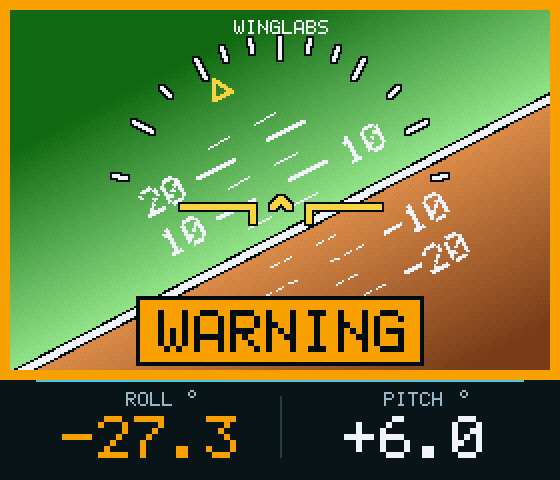
- WARNING (amber). An amber frame and a WARNING banner appear, and the angle that passed its warning limit turns amber. A short double beep sounds.
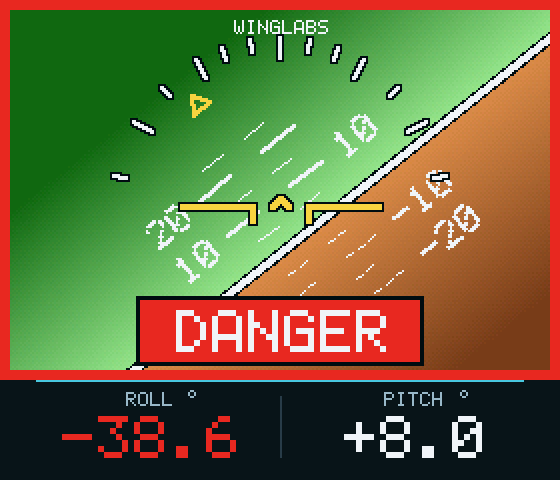
- DANGER (flashing red). A red frame and a flashing DANGER banner appear, the angle turns red, and the unit beeps continuously. Ease off the slope.
- IMU LOST. The motion sensor has stopped delivering data. The readouts show –.- and the display must not be trusted. Switch the inclinometer off and on; if it persists, see Troubleshooting.
Sky colour
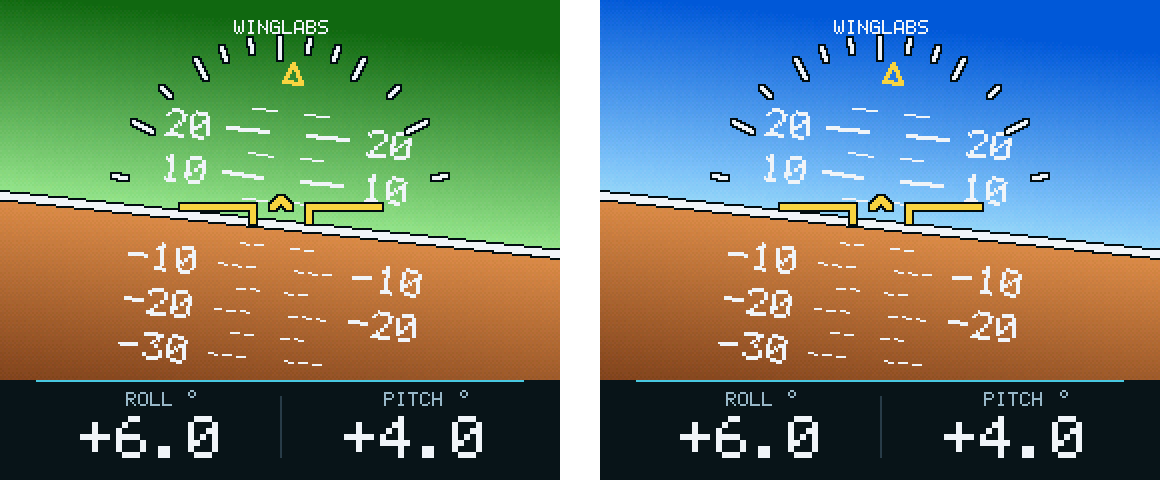
The sky above the horizon is shaded green from the factory, light near the horizon and deeper towards the top. If you prefer a blue sky, choose Blue in the Sky Color card of the control panel (section 04). The display changes at once and the choice is stored permanently. The ground below the horizon is always brown.
02 · Installation
The inclinometer measures its own orientation, so how and where you mount it matters.
Mounting
- Mount it rigidly on the dashboard or a console, with a bracket or strong double-sided tape. It must not wobble, slide or rattle: any movement of the unit shows up on the display.
- Face it straight back towards the driver, with the screen square to the length of the vehicle and its top edge level from side to side. The display is wider than it is tall. The USB-C port can be on the bottom edge or on the top edge, whichever suits your cable route (see Display orientation below).
- Keep the orientation fixed. The screen may stand upright or lean back. Whatever angle you choose, do not change it after installation.
- Keep clear of airbags and of your view. Never mount it on or near an airbag cover or in an airbag deployment zone, and never where it blocks your view of the road or of the vehicle’s own instruments.
- Protect it from heat. Dashboards get very hot in direct sun. Choose a shaded spot where possible, and do not leave the unit in direct sun with the vehicle parked.
Display orientation
The inclinometer leaves the factory set for the USB-C port at the bottom. If you prefer to mount it with the USB-C port at the top, change the setting once:
- Connect to the control panel (section 04).
- In the Display Orientation card, tap USB-C up. The screen turns over at once.
- Turn the unit over so that the USB-C port is at the top and the display reads the right way up again, and mount it.
The setting is stored permanently. A level reference already stored with Set Level (section 05) stays valid in both orientations. To go back, tap USB-C down and turn the unit back.
Power
The inclinometer is powered by USB-C at 5 V. Connect it with a USB-C cable to a USB port of the vehicle, or to a good-quality USB adapter in the 12 V socket (5 V, at least 1 A). The unit starts automatically when power is applied; there is no power switch.
- Route the cable so it cannot pull on the unit, get caught by your feet or the pedals, or be pinched by doors or seats.
- Use 5 V USB only. Never connect the unit directly to the vehicle’s 12 V wiring. Damage caused by a wrong power source is not covered by the warranty (section 11).
- Ignition-switched ports. Many USB ports only have power with the ignition on. The inclinometer then starts, and calibrates, every time you switch on the ignition.
IMPORTANT
After installing the inclinometer, park on level ground and store its level reference with Set Level (section 05). Until you do, the position at power-up is taken as level.
03 · Power-up and calibration
From power-on to the live display takes 20 to 30 seconds. Keep the vehicle still during this time if you can; the engine may be running.
- Start screen. OFF-ROAD INCLINOMETER and WINGLABS are shown.
- System check. The display, framebuffer and interface are tested; each line ends with OK.
- Motion sensor. QMI8658 IMU … OK and a progress bar to 100%.
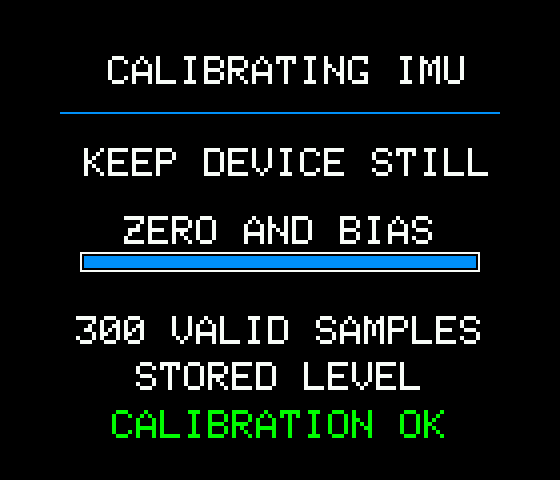
- Calibration. CALIBRATING IMU – KEEP DEVICE STILL. The unit measures the sensor bias. With a stored level reference (section 05) it shows STORED LEVEL; without one it shows LEVEL REFERENCE and takes the current position as level. It ends with CALIBRATION OK.
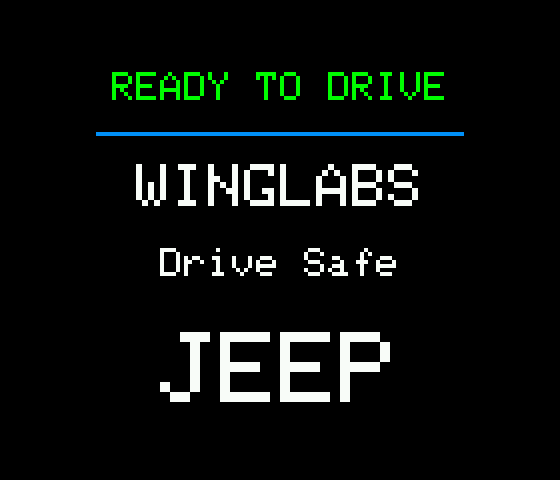
- Ready. READY TO DRIVE – Drive Safe – JEEP, or your personalised start screen if one was installed for you.
- Live display. The inclinometer display appears and follows the vehicle.
Starting while moving
If the inclinometer is switched on, or restarts after a power interruption, while the vehicle is moving, it cannot measure the sensor bias and shows CALIBRATION RETRY. With a stored level reference it then continues by itself after about 10 seconds, showing VEHICLE MOVING – STORED CALIBRATION, and the readings are referenced to your stored level as usual.
Without a stored level reference it keeps retrying until the vehicle stops. Store one with Set Level (section 05).
On many vehicles the USB ports switch off for a moment while the engine is cranked. The inclinometer then restarts and calibrates again; this is normal.
ENGINE RUNNING IS FINE
Engine vibration does not disturb the calibration: it was tested on a Jeep dashboard at idle and at 2500 rpm. Only movement of the vehicle, someone moving inside or touching the unit makes it retry.
04 · Connecting over Wi-Fi
A small control panel built into the inclinometer lets you view live values, choose the display orientation and the sky colour, set the level reference, the pitch offset and the tilt alerts, and update the firmware from any phone, tablet or computer. No app and no internet connection are needed.
Connect
- Switch the inclinometer on with the vehicle parked. Its Wi-Fi network starts immediately.
- Within 60 seconds, open the Wi-Fi settings on your phone or computer and join the network WingLabs. The password is winglabs.
- Open the control panel. Most devices open it automatically as a sign-in page. If not, open a browser and go to http://192.168.4.1
- Stay within 1 to 2 metres of the inclinometer. The Wi-Fi runs at very low power on purpose.
When Wi-Fi switches off
The Wi-Fi is meant for setting up the inclinometer with the vehicle parked. It switches off automatically:
- After 60 seconds if no device has connected.
- When the last device disconnects, once those first 60 seconds have passed.
- After 10 minutes in any case.
- Immediately when the unit detects fast motion, such as a sharp turn, a strong bump or the unit being handled. Wi-Fi then stays off until the next power-up.
To open the control panel again, switch the inclinometer off and on.
The control panel
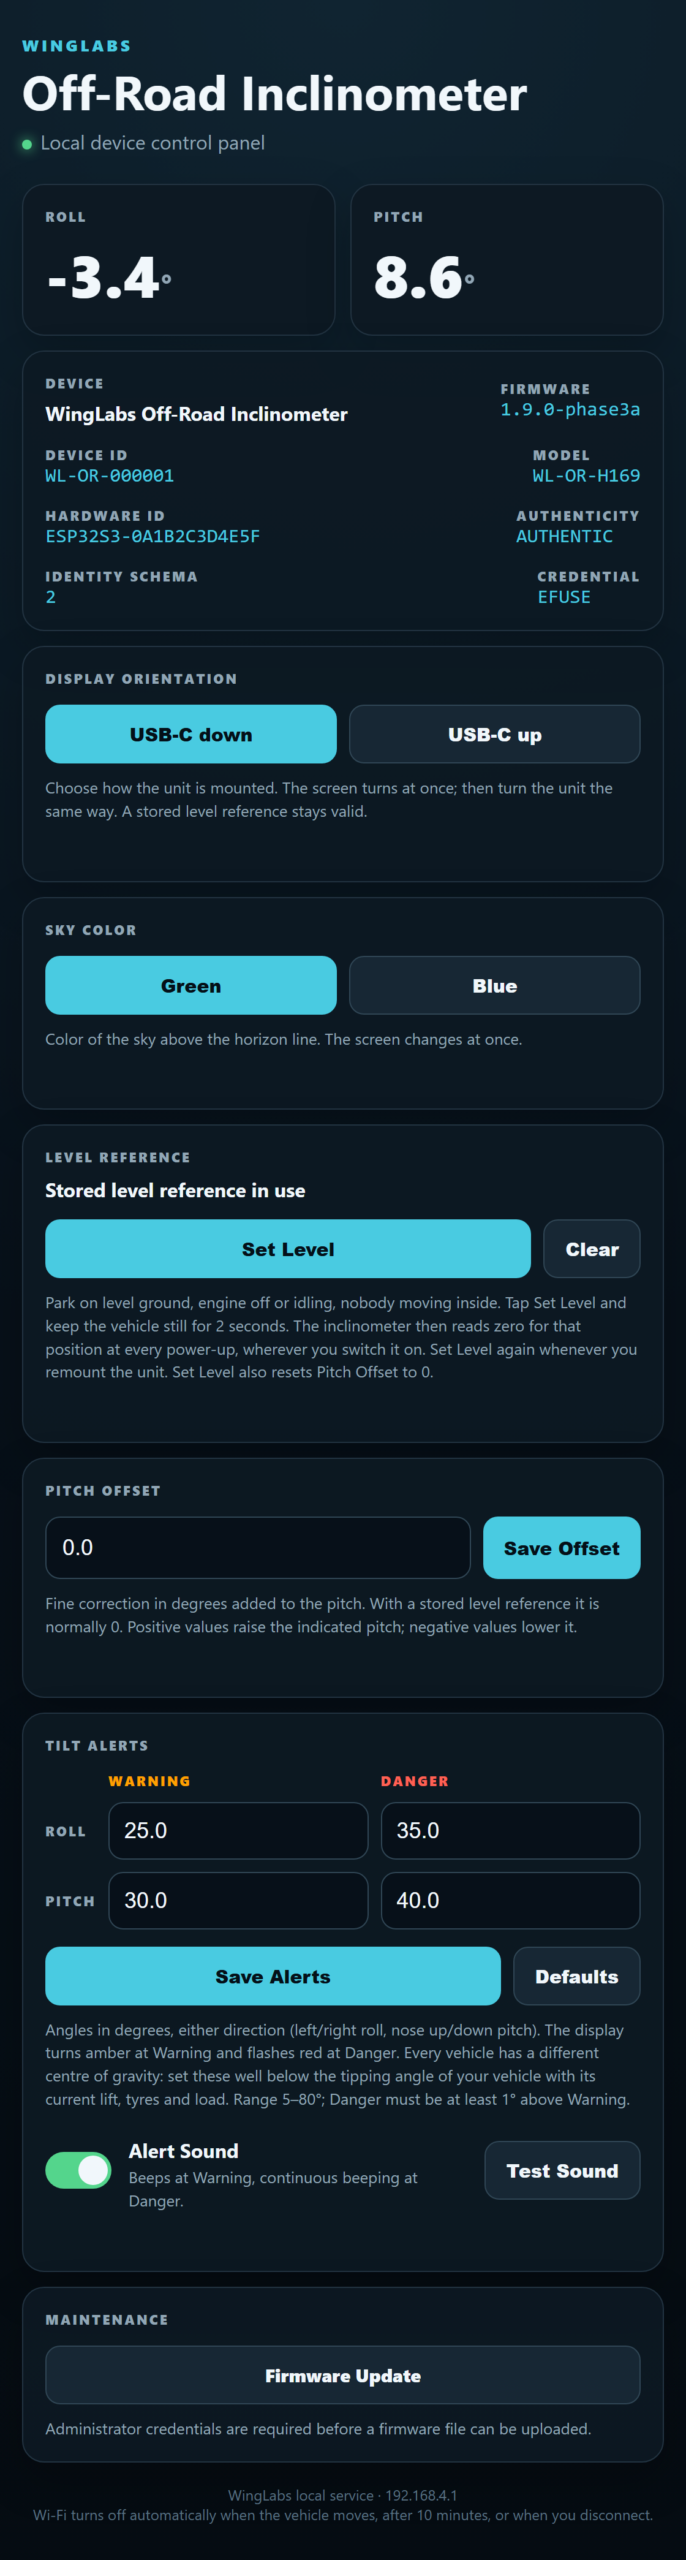
- Roll and Pitch show the live angles, refreshed several times per second.
- Device shows the product, firmware version, serial number (Device ID), model and the authenticity status. A genuine WingLabs unit shows AUTHENTIC.
- Display Orientation selects whether the unit is mounted with the USB-C port down or up (section 02).
- Sky Color shows the sky in green or blue (section 01). The display changes at once.
- Level Reference stores the level of your vehicle with Set Level, or clears it (section 05).
- Pitch Offset is a fine correction of the pitch (section 05).
- Tilt Alerts sets the warning and danger angles and switches the alert sound on or off (section 06). The live Roll and Pitch values turn amber or red when they pass these angles.
- Maintenance opens the firmware update page (section 07).
05 · Setting the level
The inclinometer needs to know what level means for your vehicle. Store it once with Set Level after installing the unit; from then on every reading is measured from that reference, wherever you switch the inclinometer on.
Set Level
- Park on level ground, both front to back and side to side: a flat workshop floor or car park. Check it with a smartphone level app if in doubt.
- Keep the vehicle still. The engine may be running, but nobody should move inside and nobody should touch the unit.
- Connect to the control panel (section 04) and tap Set Level in the Level Reference card.
- Wait about 2 seconds. Measuring… keep the vehicle still is shown, then Level saved. The display now reads close to 0.0 for roll and pitch.
GOOD TO KNOW
The level reference is stored permanently and survives power cycles and firmware updates. The card shows Stored level reference in use.
Set Level again whenever you remount the unit or change its angle.
If Movement detected is shown, keep the vehicle still and tap Set Level again.
If The screen is not upright is shown, the unit is not in its use position: mount it first, then set the level.
Clear removes the stored level; the position at power-up is used as level again.
Set Level also resets the pitch offset to 0.
Pitch offset
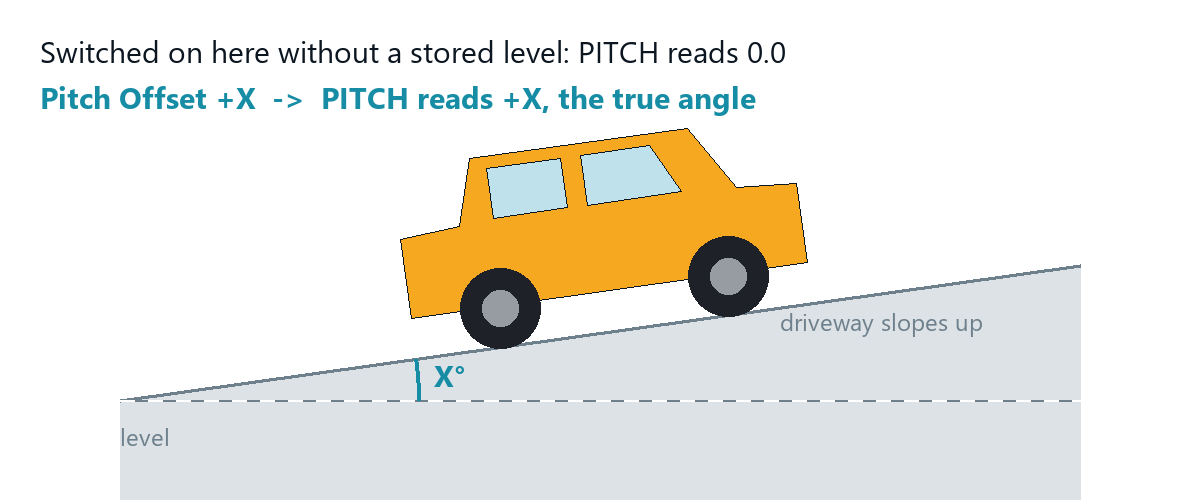
Pitch Offset is a fine correction in degrees added to the pitch reading. With a stored level reference it is normally left at 0. You can use it to fine-tune the pitch if your level ground was not perfectly level, or, without a stored level, to correct a parking spot that always slopes front to back.
- Connect to the control panel (section 04).
- Type the value in the Pitch Offset field, in degrees with one decimal, for example 1.5. The allowed range is -45.0 to +45.0. Positive values raise the indicated pitch; negative values lower it.
- Tap Save Offset. The confirmation Offset saved and applied appears and the display changes immediately.
06 · Tilt alerts
The inclinometer can warn you, on screen and with a tone, when the vehicle leans or climbs more than you choose. Every vehicle has a different centre of gravity, so you set the angles yourself.
How the alerts work
There are two levels, each with its own angle for roll (side tilt, left or right) and for pitch (climbing or descending):
| Level | On screen | Sound |
|---|---|---|
| WARNING | Amber frame and WARNING banner; the angle that passed its limit turns amber | Short double beep, repeated every 8 seconds while it lasts |
| DANGER | Red frame and flashing DANGER banner; the angle turns red | Continuous fast beeping |
- Short bumps are ignored. An alert starts only when the angle stays past its limit for about a third of a second, so a single rock or rut does not set it off.
- Alerts clear by themselves once the angle is about 2 degrees back below the limit. No beep sounds when a level clears.
- Pitch alerts use the displayed pitch, including your pitch offset (section 05).
Factory settings
| Axis | Warning | Danger |
|---|---|---|
| Roll (side slope, left or right) | 25° | 35° |
| Pitch (climb or descent) | 30° | 40° |
These are starting values, not the limits of your vehicle. Set them for your vehicle as described below.
Choose your angles
The angle at which a vehicle becomes unstable depends on its height and track width, suspension lift, tyres, roof load, cargo and passengers. Raising the vehicle or loading the roof lowers it.
- Start from your vehicle’s data. Use the maximum side-slope and climbing angles recommended by your vehicle’s manufacturer or your suspension supplier, for your current set-up.
- Set Danger well below that limit, leaving a margin for soft ground, bumps and wheels dropping into holes.
- Set Warning a few degrees lower still, so you have time to stop or change line before Danger.
- Check them again whenever you change the lift, tyres or roof load.
Change the angles
- Connect to the control panel (section 04) with the vehicle parked.
- In the Tilt Alerts card, type the four angles in degrees: Warning and Danger for Roll and for Pitch. Each angle must be between 5 and 80 degrees, and Danger at least 1 degree above Warning.
- Tap Save Alerts. The confirmation Alerts saved and applied appears and the new angles are used immediately.
- To go back to the factory settings, tap Defaults.
Alert sound
- Alert Sound switch. Turns the beeps on or off. The on-screen alerts always remain active. The sound is on from the factory.
- Test Sound. Plays a sample of the warning beep and then the danger beeping, even when the alert sound is off, so you can check that you hear it over the engine.
GOOD TO KNOW
The angles and the sound setting are stored permanently and survive power cycles and firmware updates.
Alerts are measured from your stored level reference (section 05). Without one, they are measured from the position at power-up: switched on on a side slope, roll alerts would come early on one side and late on the other.
While IMU LOST is shown, no alerts are given.
07 · Updating the firmware
WingLabs may release new firmware with improvements. Updates are installed over Wi-Fi from the control panel and take about one minute.
Before you start
- Use only an official WingLabs firmware file (a .bin file) made for your model, WL-OR-H169. Installing an older or a different firmware is not supported.
- Save the file on the phone or computer you will use.
- Have the administrator credentials ready: user root, password flysafe.
- Park the vehicle and keep the power to the inclinometer stable for the whole update: do not switch the ignition off or start the engine while it runs.
Install the update
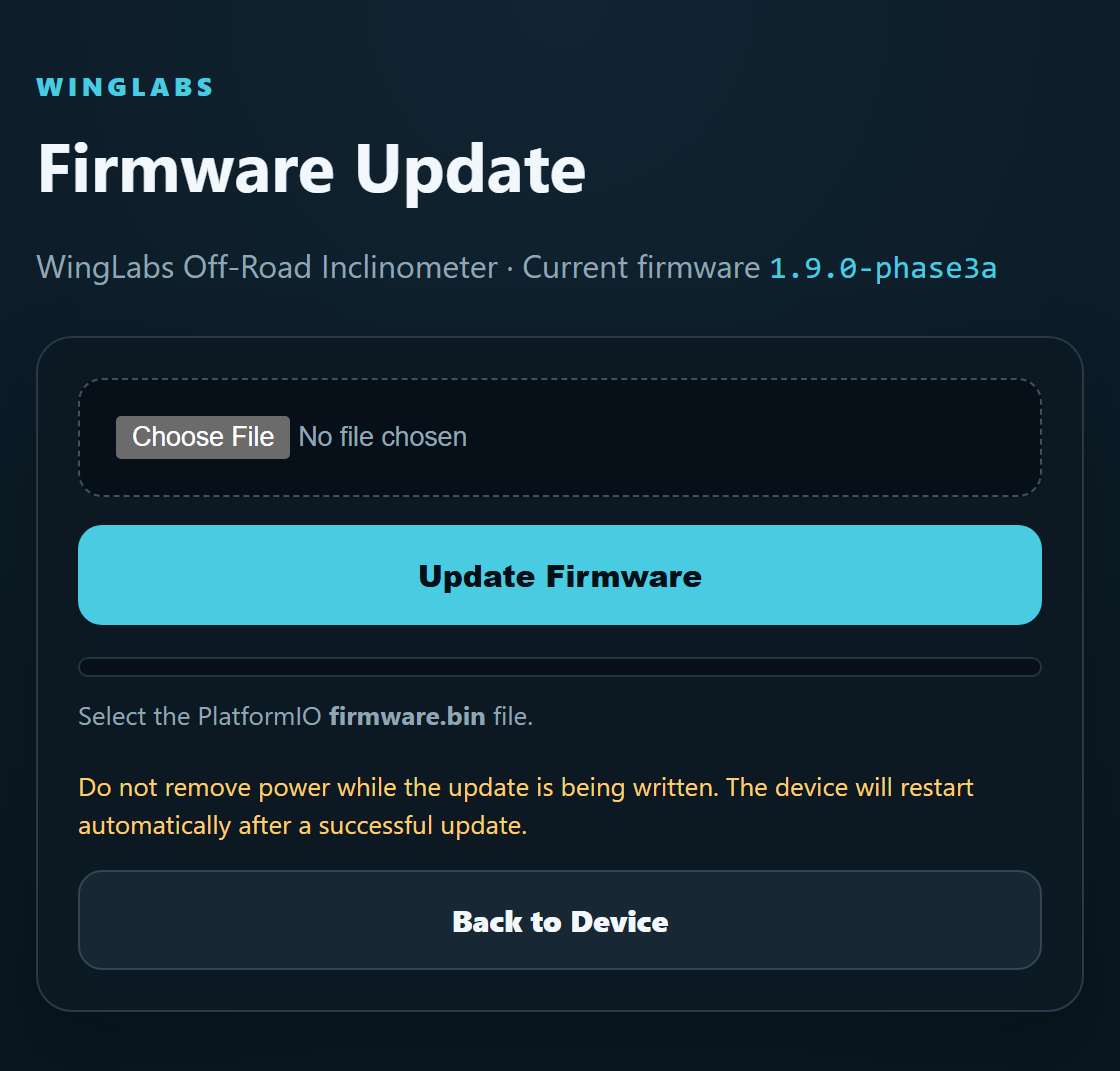
- Connect to the control panel (section 04) and tap Firmware Update in the Maintenance card.
- Sign in with the administrator credentials when your browser asks for them.
- Tap Choose File and select the firmware .bin file.
- Tap Update Firmware. The progress bar fills while the file is transferred and checked.
- Wait for Firmware Updated. The inclinometer restarts by itself and calibrates again, so keep the vehicle still.
- Check the new version: reconnect to the WingLabs network and confirm the Firmware value on the control panel.
DO NOT INTERRUPT THE UPDATE
Do not remove power, start the engine or close the page while the update is being written. If the transfer is interrupted, the new file is discarded and the inclinometer starts with its current firmware; simply repeat the update.
08 · Safety
- A driving aid, not a safety device. The inclinometer shows angles and warns at the angles you set (section 06); it does not know when your vehicle will actually tip over. The angle at which a vehicle becomes unstable depends on the vehicle, its load, tyres, suspension and the terrain, and it can tip before any alert, for example when a wheel drops into a hole or the ground gives way. Always drive within the limits recommended by your vehicle’s manufacturer and use your own judgement.
- Never rely on the absence of an alert. No alert does not mean the slope is safe. Alerts set too high, a switched-off sound or an inclinometer switched on on a slope can all keep it silent.
- Keep your eyes on the terrain. Glance at the display only when it is safe to do so. Never let it distract you from driving.
- Never use the control panel while driving. Set up the inclinometer only with the vehicle parked.
- Readings during acceleration. Hard braking, accelerating and strong bumps can make the readings swing briefly. The readings are most reliable when moving slowly and steadily, which is how steep terrain should be driven.
- Check before every trip that the display reads close to 0.0 on level ground. If it does not, set the level again (section 05).
- Mount it safely. Keep it clear of airbags and of your view (section 02), and make sure it cannot come loose.
- Never change the alert angles while driving. Do it only with the vehicle parked, like every other setting.
- Protect the unit from impacts, water, mud and prolonged direct sunlight.
AUTHENTICITY
Every WingLabs instrument carries a unique serial number and a hardware-protected credential. The control panel shows AUTHENTIC for a genuine unit.
09 · Troubleshooting
| Symptom | What to do |
|---|---|
| The screen stays dark | Check that the USB port has power (many only work with the ignition on), and try another USB-C cable or a 12 V USB adapter. |
| The display stays on CALIBRATION RETRY | The vehicle is moving or someone is touching the unit. With a stored level it continues by itself after about 10 seconds; without one, stop the vehicle and keep it still. Store a level with Set Level (section 05). |
| The display does not read 0.0 on level ground | No level is stored and the unit was switched on on a slope, or the unit was remounted. Park on level ground and tap Set Level (section 05). |
| Set Level shows Movement detected | The vehicle moved or someone touched the unit during the 2-second measurement. Keep everything still and try again. |
| Set Level shows The screen is not upright | The unit is lying flat or far from its use position. Mount it as described in section 02, then set the level. |
| The inclinometer restarts when the engine is started or on rough ground | The USB power was interrupted: normal while cranking on many vehicles; on rough ground, check that the cable is fully plugged in and cannot pull on the connector. With a stored level the readings stay correct after the restart. |
| Readings swing when braking or over bumps | Normal: strong acceleration affects the motion sensor briefly. The readings settle when you move steadily. |
| WARNING or DANGER on level ground, or alerts much earlier on one side | No level is stored and the unit was switched on on a slope. Park on level ground and tap Set Level (section 05). |
| Alerts come too early or too late | Adjust the Warning and Danger angles in the Tilt Alerts card (section 06). |
| No beep with WARNING or DANGER on screen | The alert sound is switched off. Turn on Alert Sound in the Tilt Alerts card and tap Test Sound to check it. |
| Save Alerts shows an error | Each angle must be 5 to 80 degrees and Danger at least 1 degree above Warning. |
| The display is upside down | The Display Orientation setting does not match how the unit is mounted. Choose USB-C down or USB-C up in the control panel (section 02). |
| IMU LOST is shown | Switch the inclinometer off and on. If it appears again, contact your WingLabs dealer. |
| The WingLabs Wi-Fi network does not appear | It is only available for 60 seconds after power-up and switches off on fast motion. Switch off and on with the vehicle parked and connect promptly. |
| The control panel does not open | Make sure you are connected to WingLabs, then open http://192.168.4.1 in a browser. Turn off mobile data if your phone keeps switching networks. |
| The Wi-Fi disconnects during use | The 10-minute session ended or the unit detected motion. Switch off and on to start a new session. |
| The firmware update failed | The unit keeps running its current firmware. Reconnect, check that you selected the correct .bin file for your model and repeat the update. |
| The browser asks for a password on the update page | Enter user root and password flysafe. |
10 · Specifications
| Item | Value |
|---|---|
| Model | WL-OR-H169 (landscape display, USB-C at the bottom or at the top) |
| Display | 1.69 inch colour IPS LCD, 280 x 240 pixels, landscape |
| Processor | ESP32-S3 dual core, 240 MHz, 16 MB flash, 8 MB PSRAM |
| Motion sensor | QMI8658 6-axis (3-axis gyroscope, 3-axis accelerometer) |
| Displayed range | Roll 360 degrees, pitch +/-90 degrees |
| Readout resolution | 0.1 degree |
| Display refresh | Up to 25 frames per second |
| Start-up time | 20 to 30 seconds including calibration; about 30 seconds when the vehicle is moving (stored calibration) |
| Level reference | Stored with Set Level (about 2 s, vehicle still), kept permanently; used at every power-up |
| Pitch offset | -45.0 to +45.0 degrees, stored permanently |
| Tilt alerts | WARNING and DANGER, separate roll and pitch angles, 5 to 80 degrees, stored permanently; factory roll 25/35, pitch 30/40 degrees |
| Alert sound | Built-in buzzer: double beep at WARNING, continuous beeping at DANGER; can be switched off |
| Wi-Fi | 2.4 GHz access point, network WingLabs, 8.5 dBm (about 7 mW) |
| Control panel | http://192.168.4.1 |
| Wi-Fi availability | 60 s connection window, 10 min maximum, off on fast motion |
| Power | 5 V through USB-C, from a vehicle USB port or a 12 V USB adapter (at least 1 A) |
| Firmware | 1.9.0 (shown on the control panel) |
11 · Warranty
WingLabs warrants this inclinometer against defects in materials and workmanship for 12 months from the date of purchase.
What is covered
If the inclinometer fails during the warranty period because of a manufacturing defect, while it has been installed, powered and used as described in this manual, WingLabs will repair or replace it, at its choice, free of charge. A repaired or replacement unit is covered for the remainder of the original warranty period.
What is not covered
The warranty does not cover damage or faults caused by:
- A wrong power source, including connecting the unit directly to the vehicle’s 12 V wiring, faulty or unsuitable USB adapters, and voltage spikes or faults of the vehicle’s electrical system.
- Accidents, rollovers, impacts and falls, water, mud, dust, heat or prolonged direct sunlight.
- Opening, modifying or repairing the unit, or any attempt to do so, by anyone other than WingLabs.
- Installing firmware that is not an official WingLabs firmware for your model.
- Use outside its purpose, which is a visual driving aid for off-road vehicles, and normal wear or cosmetic damage.
Limitation of liability
The inclinometer is a driving aid only (section 08). To the fullest extent permitted by law, WingLabs is not liable for any loss of or damage to vehicles, other equipment, property or persons, including rollovers and accidents, arising from the use of the inclinometer, its incorrect installation or a wrong power source. Where liability cannot be excluded, it is limited to the purchase price of the inclinometer.
How to make a claim
- Contact your WingLabs dealer within the warranty period and describe the fault.
- Quote the serial number (Device ID, shown on the control panel, section 04) and keep your proof of purchase.
- Return the unit only after your dealer has confirmed how to send it.
YOUR STATUTORY RIGHTS
This warranty is given in addition to, and does not affect, the rights you have as a consumer under the law of the country where you bought the inclinometer.