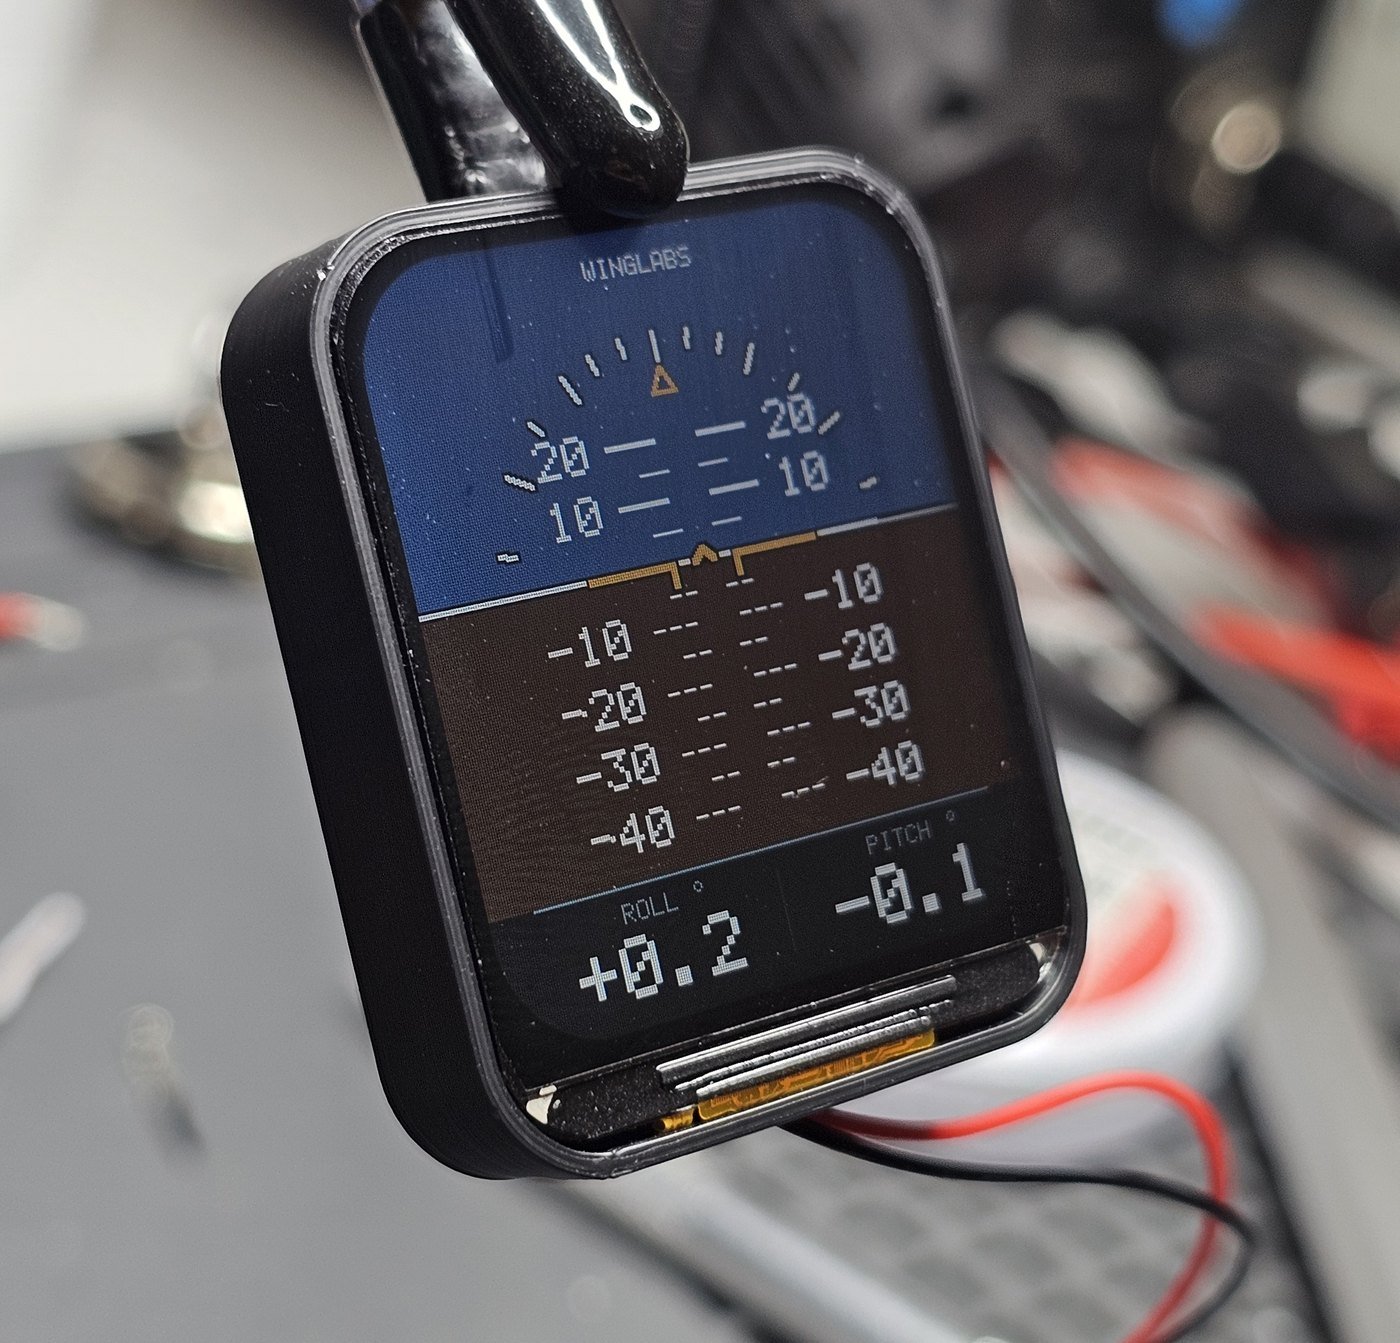
Models: WL-AI-V169 (vertical) · WL-AI-H169 (horizontal) · Firmware: 1.5 · For radio-controlled model aircraft.
ABOUT THIS MANUAL
Screens and illustrations show the vertical model WL-AI-V169. The horizontal model WL-AI-H169 works in exactly the same way; its display is simply laid out in landscape.
01 · Getting to know your instrument
A compact, full-colour artificial horizon for your model. It shows bank and pitch in real time from its own motion sensor, and needs no connection to the receiver or flight controller.
Reading the display
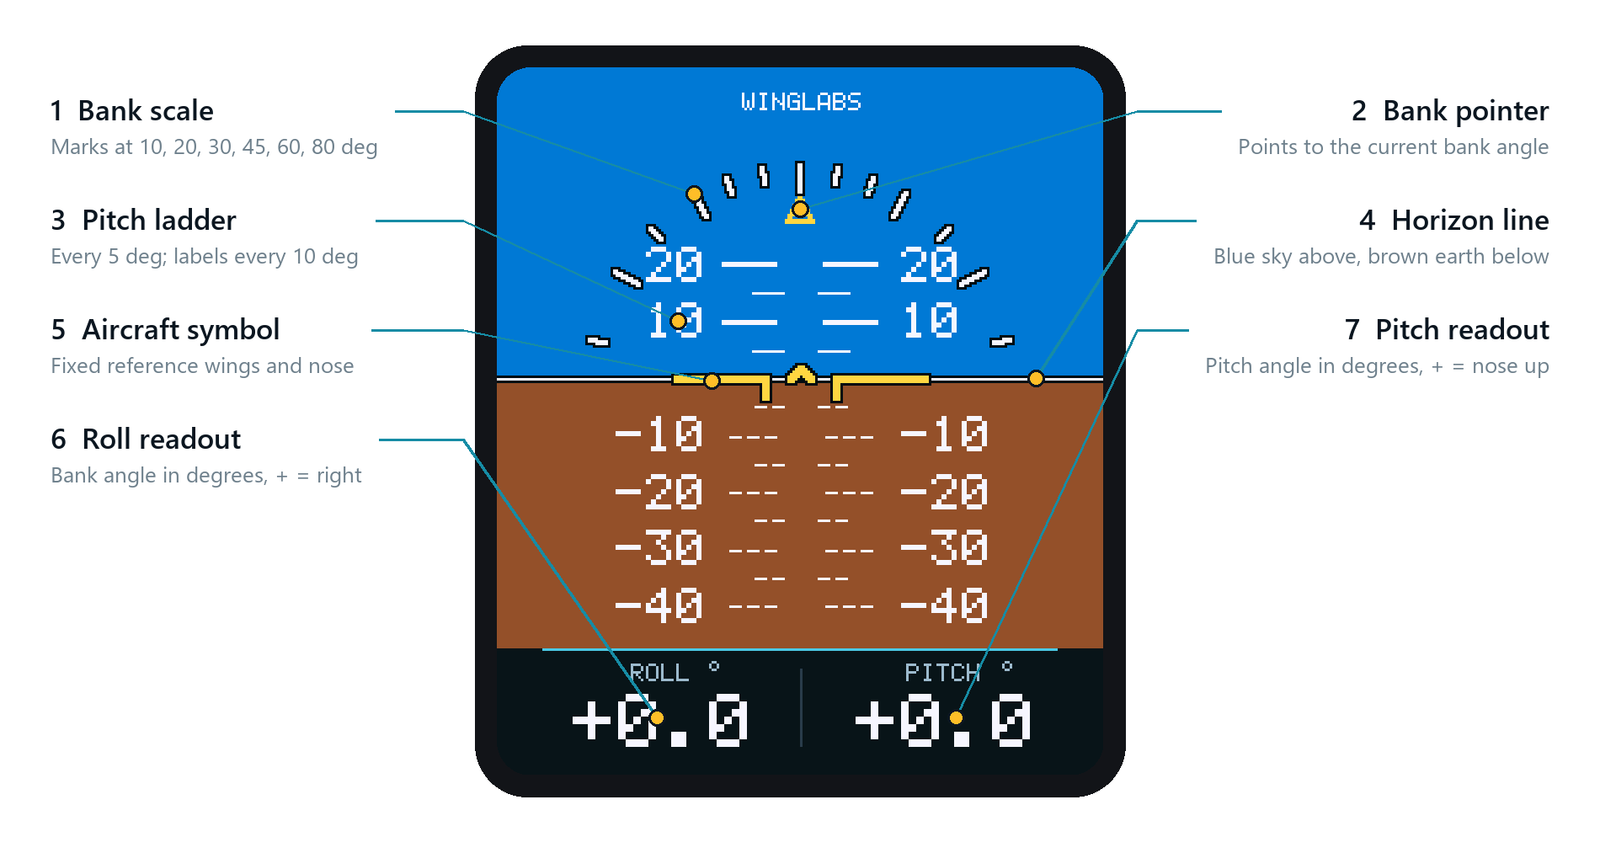
The aircraft symbol in the centre is fixed. The horizon, the pitch ladder and the bank pointer move around it exactly as the real horizon would appear from the cockpit:
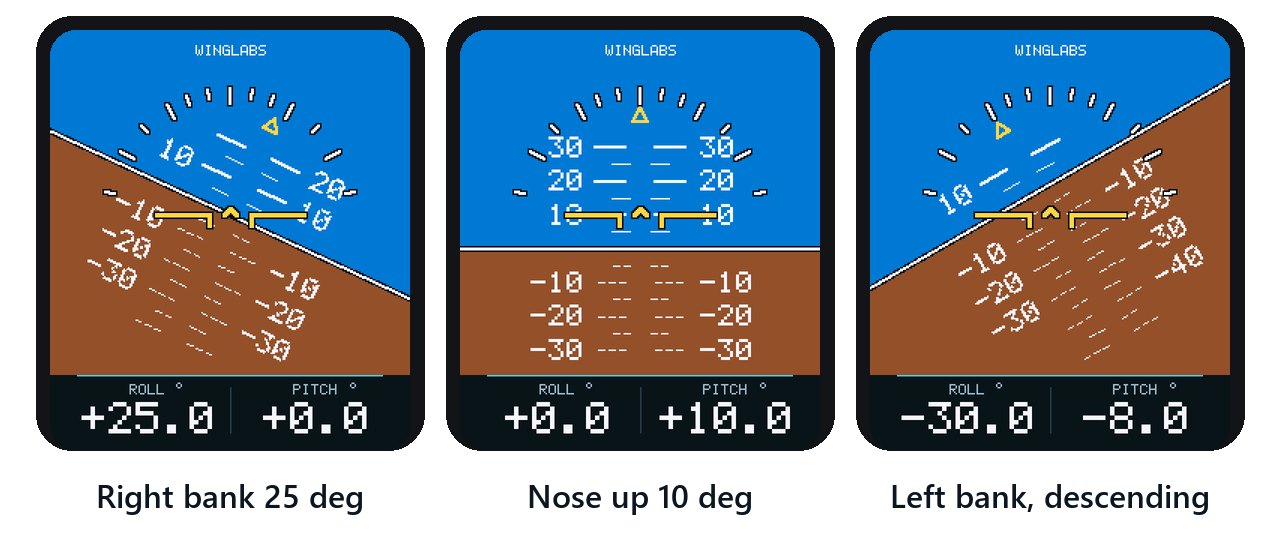
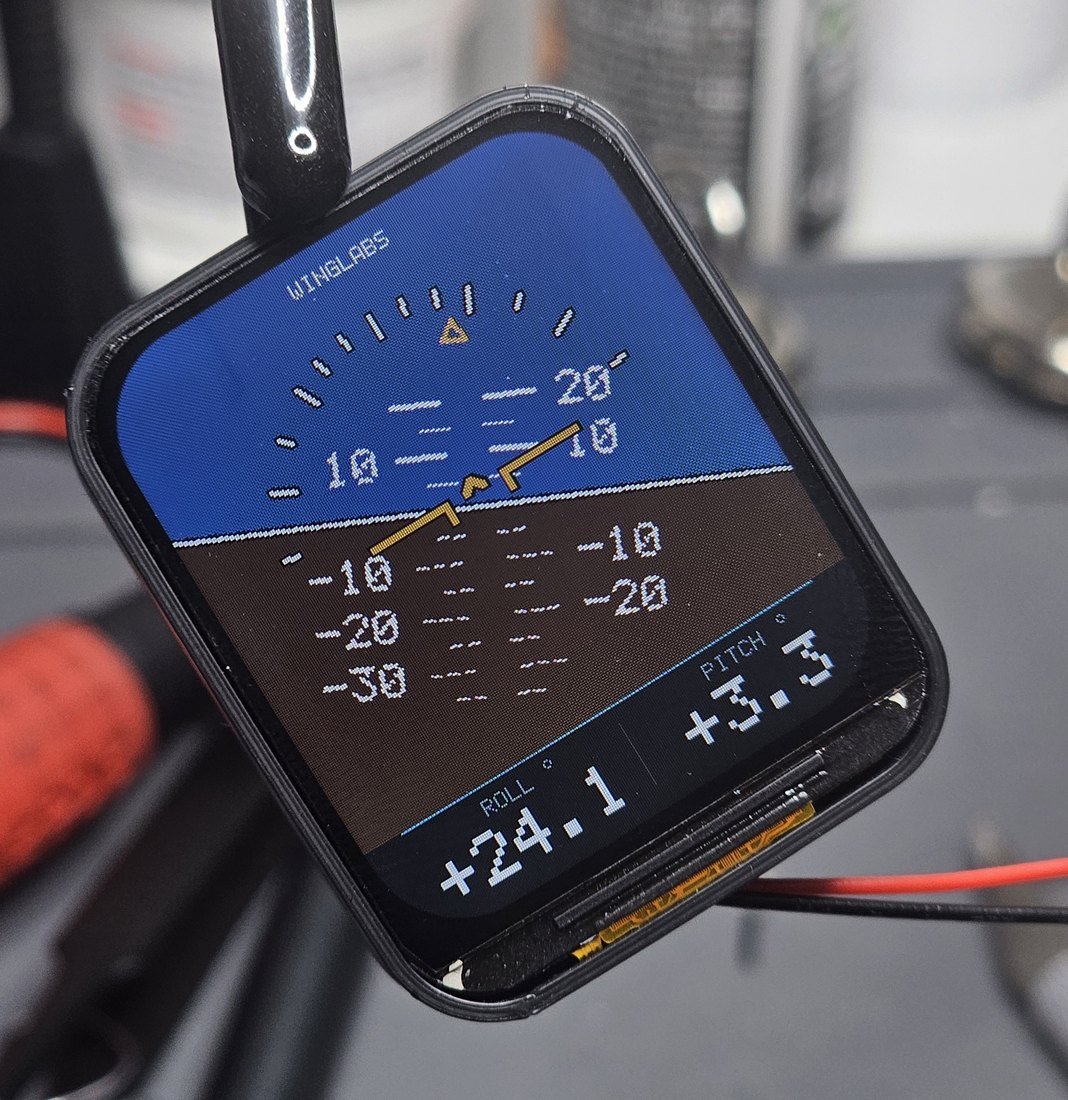
- Bank (roll). The horizon tilts and the gold pointer moves along the bank scale. The roll readout shows the angle in degrees: positive values are a right bank, negative values a left bank.
- Pitch. The horizon moves up or down behind the aircraft symbol. Each ladder line is 5 degrees; numbered lines are every 10 degrees. Lines above the horizon are solid, lines below are dashed. Positive pitch is nose up.
Status indications
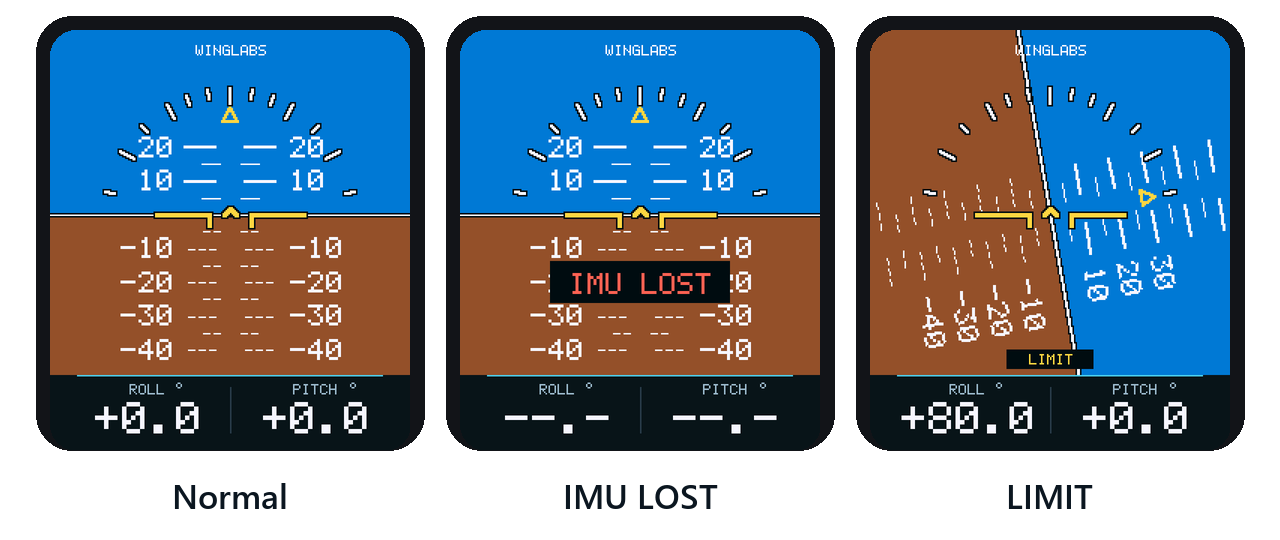
- IMU LOST. The motion sensor has stopped delivering data. The readouts show –.- and the attitude must not be trusted. Power-cycle the unit; if it persists, see Troubleshooting.
- LIMIT. The aircraft is beyond the display range (more than 80 degrees of bank or 40 degrees of pitch). The display holds at the edge of its range until the attitude returns within limits.
02 · Installation
The instrument measures its own orientation. Its level reference is taken every time it is switched on, so how and where you mount it matters.
Mounting
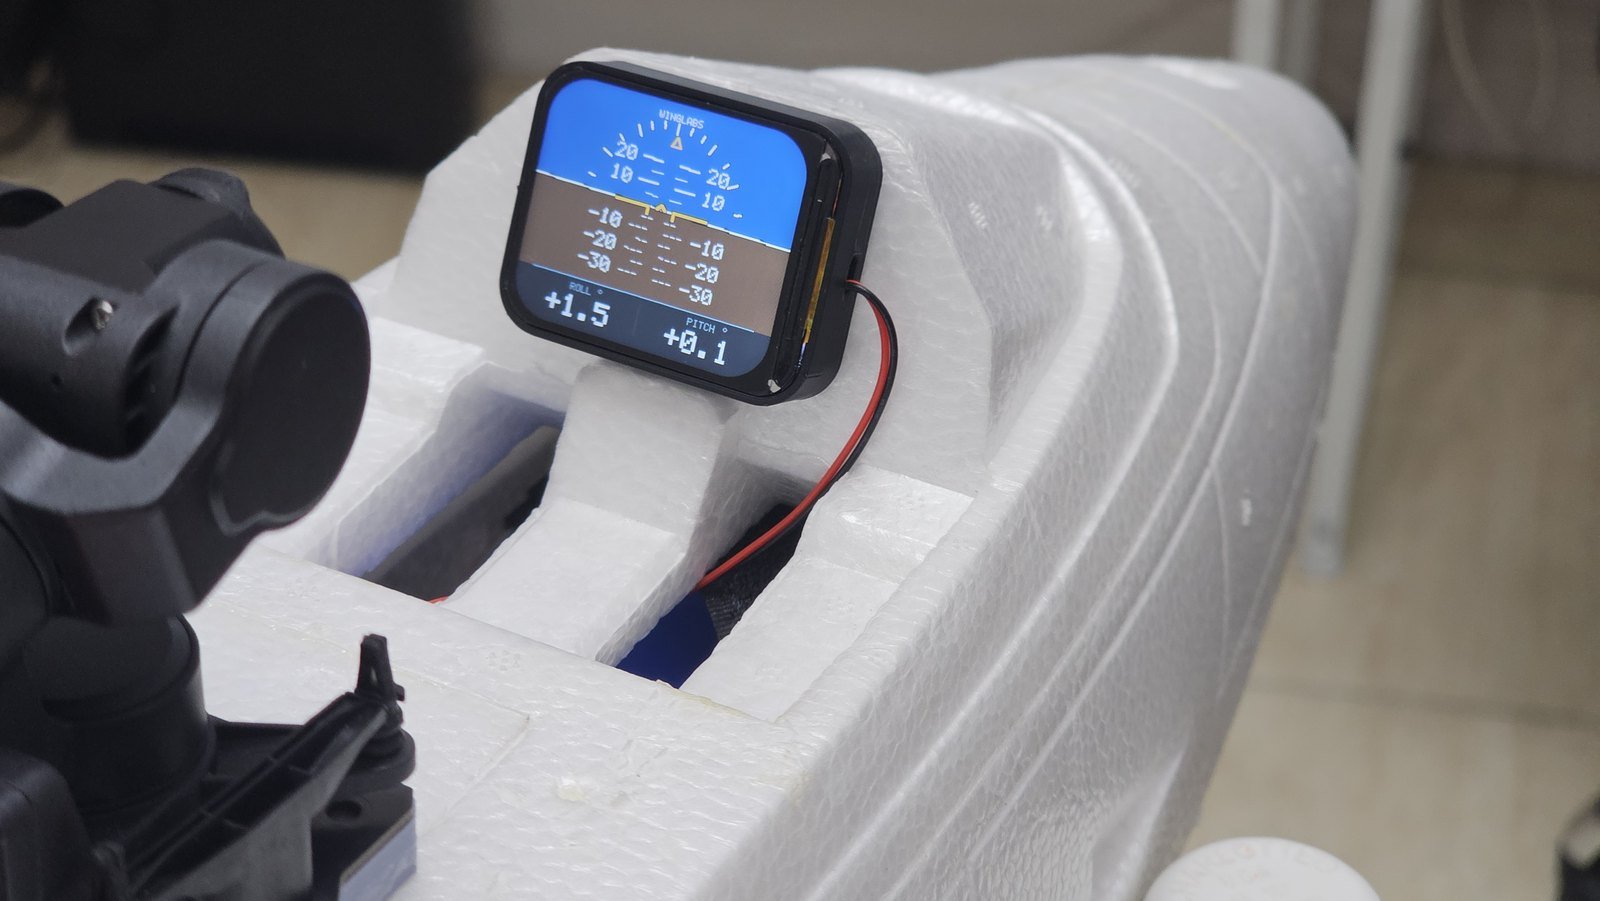
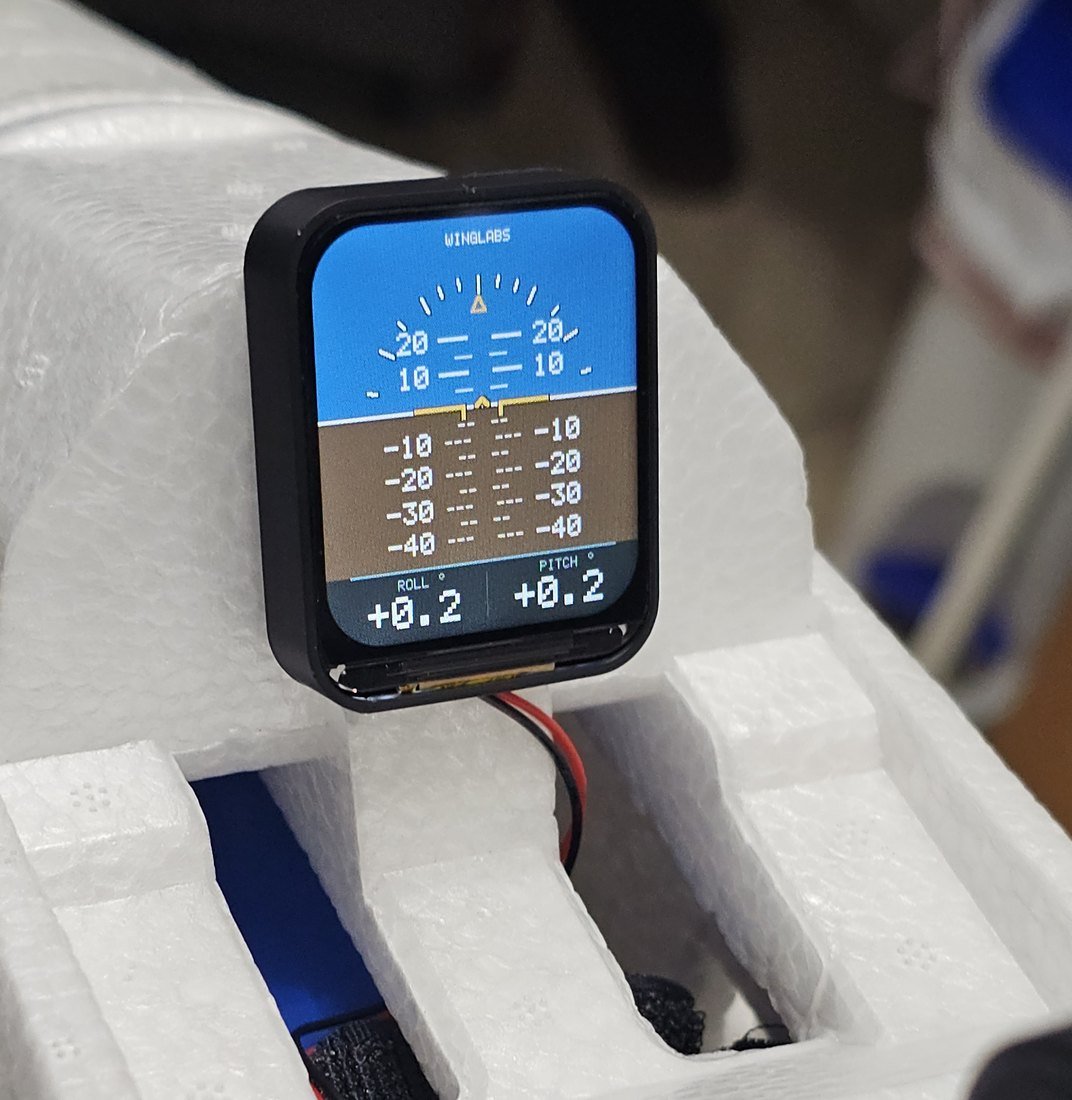
- Mount it rigidly in the cockpit or on the instrument panel, with the screen facing the pilot figure or the camera. Use foam tape or a bracket that does not let the unit vibrate or move.
- Keep the orientation fixed. The panel may stand upright or lean back, as on a real instrument panel. Whatever angle you choose, do not change it after installation.
- Align it with the aircraft. The top edge of the screen should be parallel to the wings, and the screen should face straight forward along the fuselage axis.
- Keep it clear of strong magnets and motors where possible, and route the power lead so it cannot pull on the unit.
Power
The instrument is powered through its servo lead. Plug it into any free channel of your receiver, or into the 5 V output of a BEC. It only takes power from the lead: the channel signal is not used, so nothing needs to be set up on your transmitter. The unit starts automatically when power is applied; there is no power switch.
- Observe polarity: black wire negative (-), red wire positive (+).
- Use 5 V, 5.5 V maximum. Never connect it to a receiver or BEC set above 5.5 V, such as 6 V, 7.4 V or 8.4 V (HV) systems: it will damage the unit. Damage caused by a wrong connection or a wrong voltage is not covered by the warranty (section 10).
IMPORTANT
The level reference is captured at power-up. Always switch the instrument on with the aircraft standing still in its normal resting attitude, wings level, and leave it undisturbed until the live display appears.
03 · Power-up and calibration
From power-on to the live display takes 20 to 30 seconds. Keep the aircraft completely still during this time.
- Start screen. ATTITUDE INDICATOR and WINGLABS are shown.
- System check. The display, framebuffer and interface are tested; each line ends with OK.
- Motion sensor. QMI8658 IMU … OK and a progress bar to 100%.
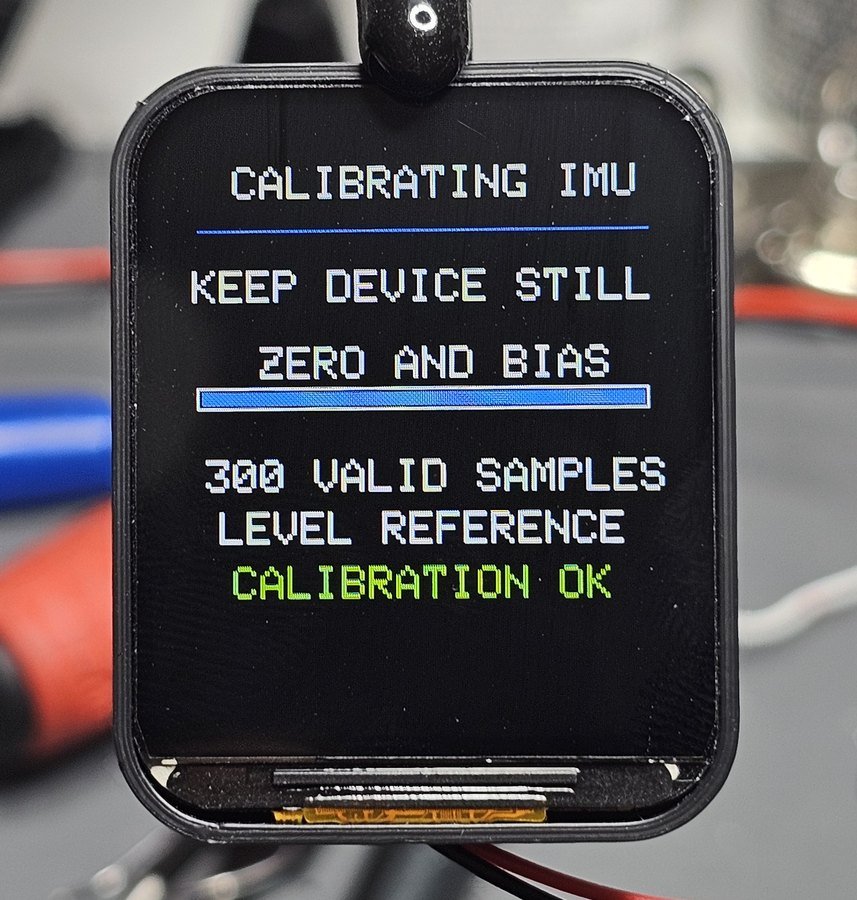
- Calibration. CALIBRATING IMU – KEEP DEVICE STILL. The unit measures the sensor bias and takes the current attitude as its level reference. It ends with CALIBRATION OK.
- Ready. READY FOR FLIGHT – Fly Safe, or your personalised start screen if one was installed for you.
- Live display. The artificial horizon appears and follows the aircraft.
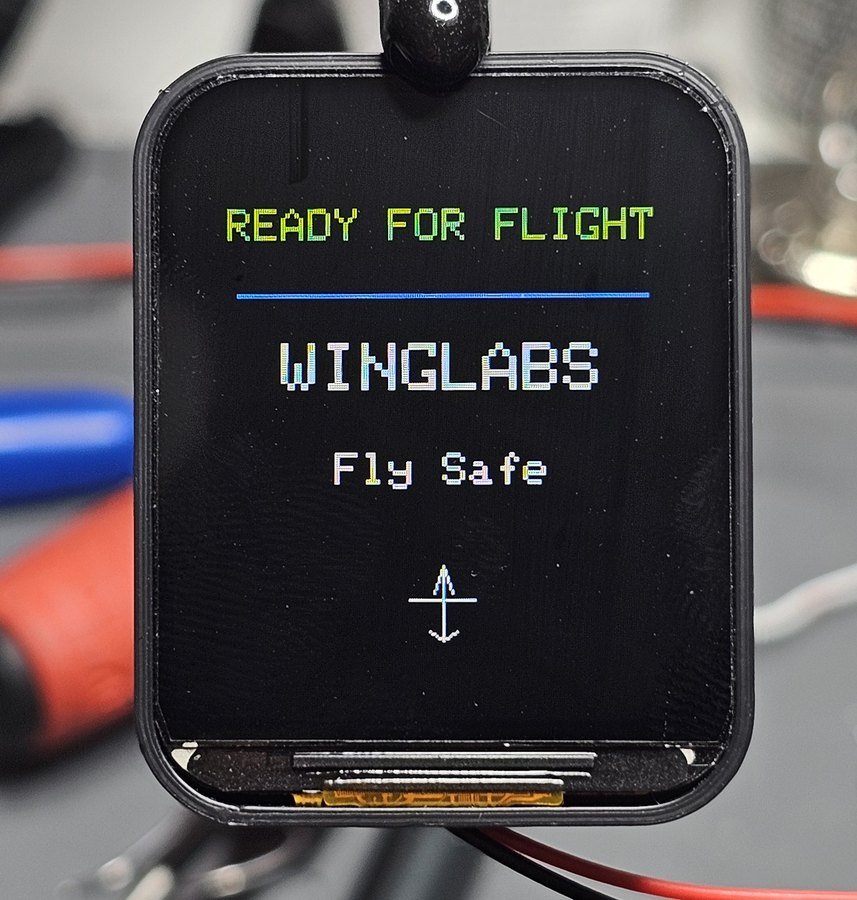
IF YOU SEE CALIBRATION RETRY
The unit detected movement or vibration while calibrating and simply starts the measurement again. Keep the aircraft still; calibration continues automatically until it succeeds. Make sure motors are off and nobody is touching the model.
The Wi-Fi network for the control panel is switched on at the same time; see the next section.
04 · Connecting over Wi-Fi
A small control panel built into the instrument lets you view live values, set the pitch offset and update the firmware from any phone, tablet or computer. No app and no internet connection are needed.
Connect
- Switch the instrument on. Its Wi-Fi network starts immediately.
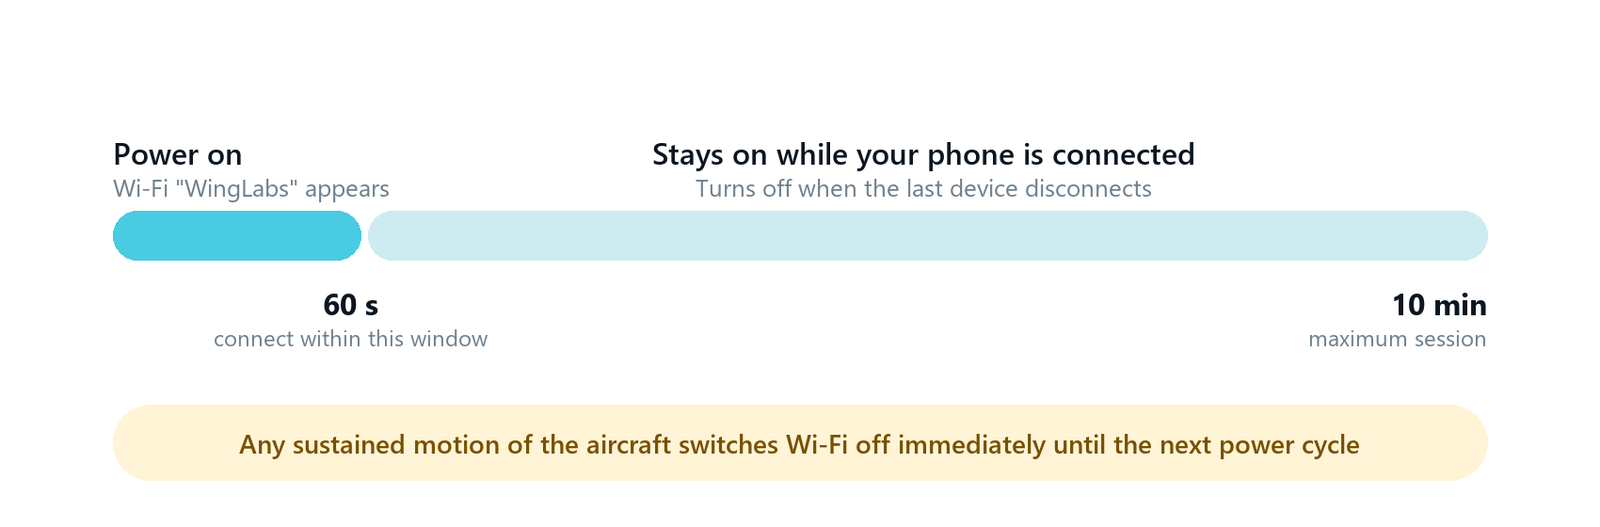
- Within 60 seconds, open the Wi-Fi settings on your phone or computer and join the network WingLabs. The password is winglabs.
- Open the control panel. Most devices open it automatically as a sign-in page. If not, open a browser and go to http://192.168.4.1
- Stay within 1 to 2 metres of the aircraft. The transmitter runs at very low power on purpose.
When Wi-Fi switches off
To keep the 2.4 GHz band free for your radio, the instrument switches its Wi-Fi off automatically:
- After 60 seconds if no device has connected.
- When the last device disconnects, once those first 60 seconds have passed.
- After 10 minutes in any case.
- Immediately when the aircraft moves, for example when it is carried or flown. Wi-Fi then stays off until the next power-up.
To open the control panel again, simply switch the instrument off and on.
The control panel
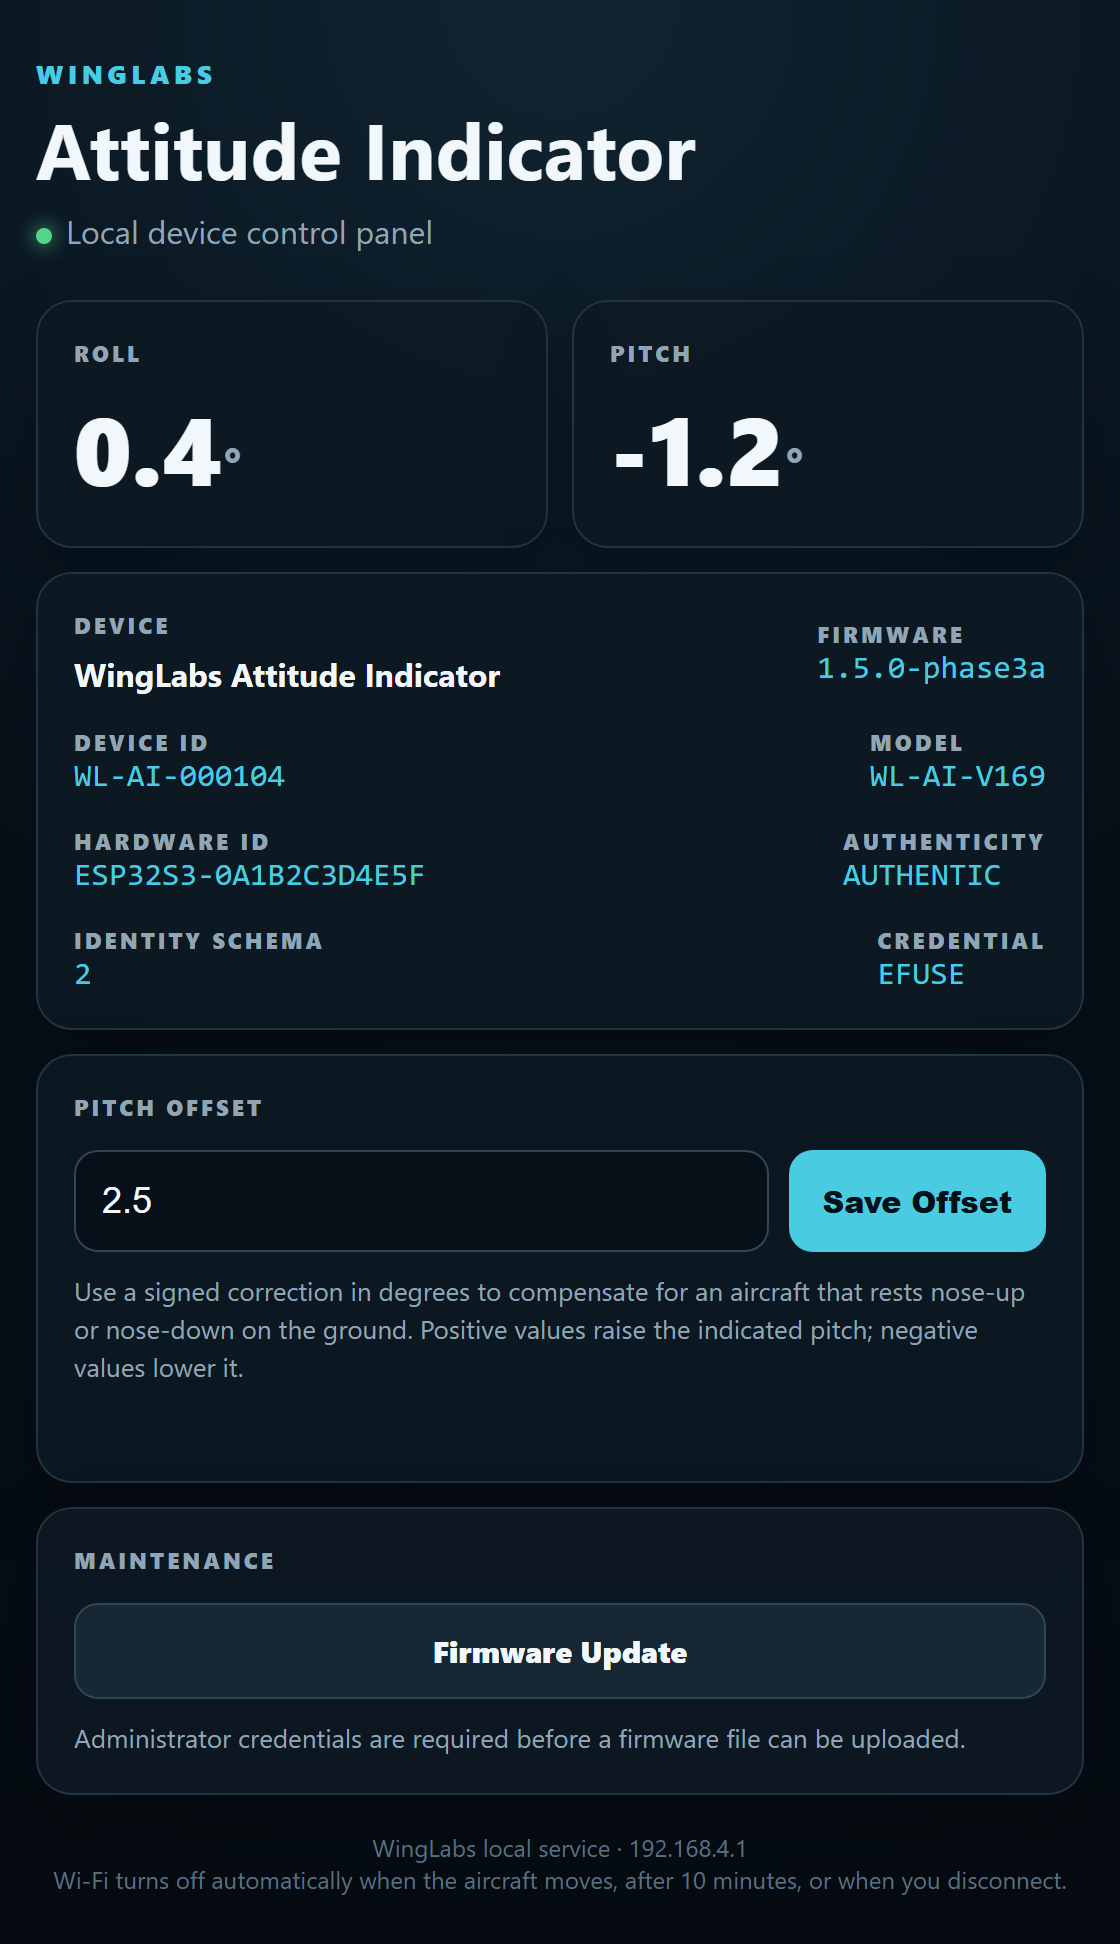
- Roll and Pitch show the live attitude, refreshed several times per second.
- Device shows the product, firmware version, serial number (Device ID), model and the authenticity status. A genuine WingLabs unit shows AUTHENTIC.
- Pitch Offset lets you correct the pitch reference (section 05).
- Maintenance opens the firmware update page (section 06).
05 · Adjusting the pitch offset
The instrument takes the attitude at power-up as level. Many models rest nose-up on their landing gear, so in level flight the display would show a small nose-down pitch. The pitch offset corrects this.
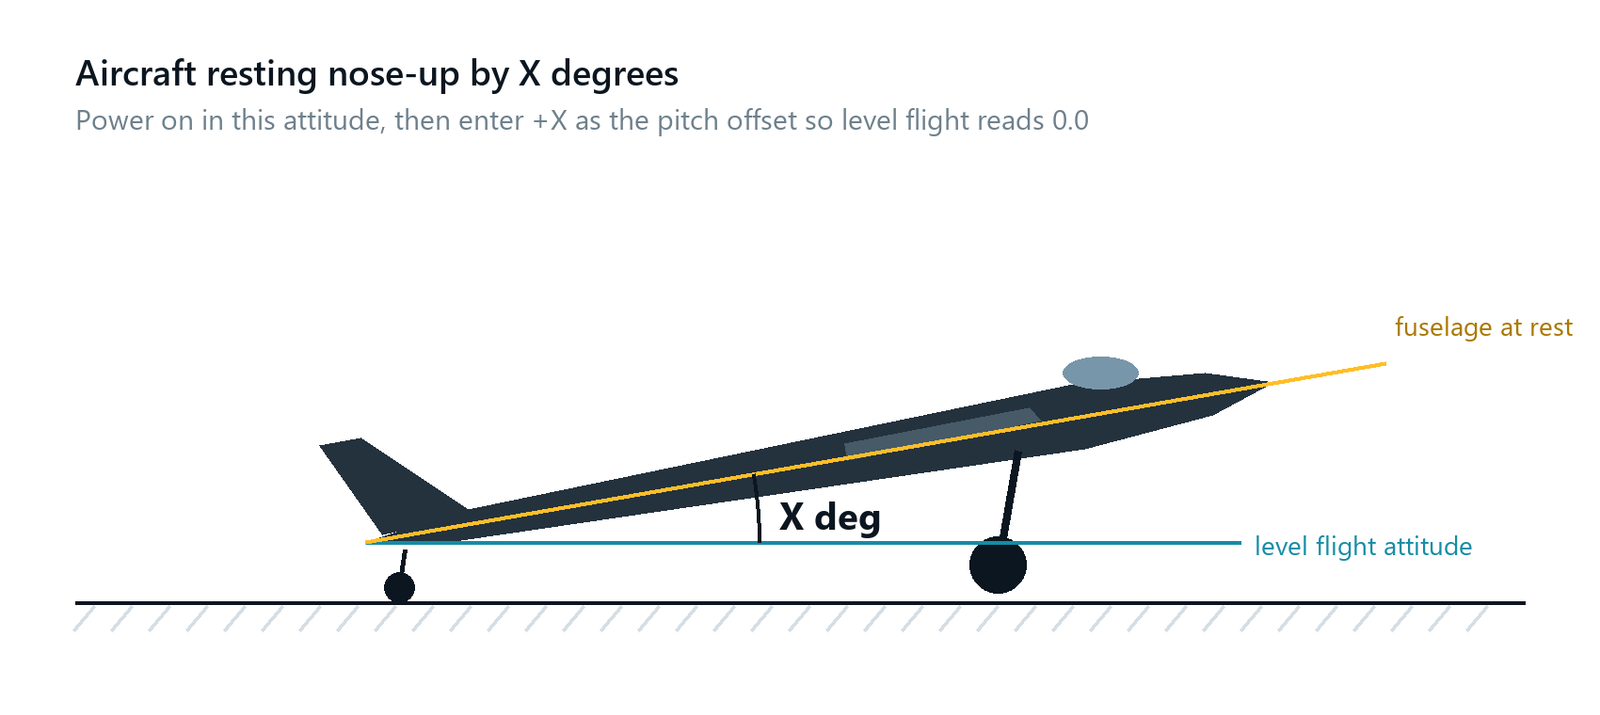
Find the offset with the instrument itself
- Switch on with the aircraft resting normally on the ground, and wait for the live display.
- Raise the tail (or lower the nose) by hand until the fuselage is in its level-flight attitude, using a reference such as the wing root or the canopy frame.
- Read the pitch value. It will be negative, for example -6.5.
- Your offset is the same number with the opposite sign: +6.5 in this example.
You can also measure the resting angle X directly with an inclinometer or a smartphone level app placed on a flat reference of the fuselage. A model that rests nose-up by X degrees needs an offset of +X.
Save the offset
- Connect to the control panel (section 04).
- Type the value in the Pitch Offset field, in degrees with one decimal, for example 6.5. The allowed range is -45.0 to +45.0.
- Tap Save Offset. The confirmation Offset saved and applied appears and the display changes immediately.
- Check the result: with the aircraft held in level-flight attitude the pitch should now read close to 0.0.
GOOD TO KNOW
Positive values raise the indicated pitch; negative values lower it.
The offset is stored permanently and survives power cycles and firmware updates.
Alternatively, you can switch the instrument on while the aircraft is supported in level-flight attitude and leave the offset at 0.0.
06 · Updating the firmware
WingLabs may release new firmware with improvements. Updates are installed over Wi-Fi from the control panel and take about one minute.
Before you start
- Use only an official WingLabs firmware file (a .bin file) made for your exact model, WL-AI-V169 or WL-AI-H169. Installing an older or a different firmware is not supported.
- Save the file on the phone or computer you will use.
- Have the administrator credentials ready: user root, password flysafe.
- Provide stable power and keep the aircraft still for the whole update.
Install the update
- Connect to the control panel (section 04) and tap Firmware Update in the Maintenance card.
- Sign in with the administrator credentials when your browser asks for them.
- Tap Choose File and select the firmware .bin file.
- Tap Update Firmware. The progress bar fills while the file is transferred and checked.
- Wait for Firmware Updated. The instrument restarts by itself and calibrates again, so keep it still.
- Check the new version: reconnect to the WingLabs network and confirm the Firmware value on the control panel.
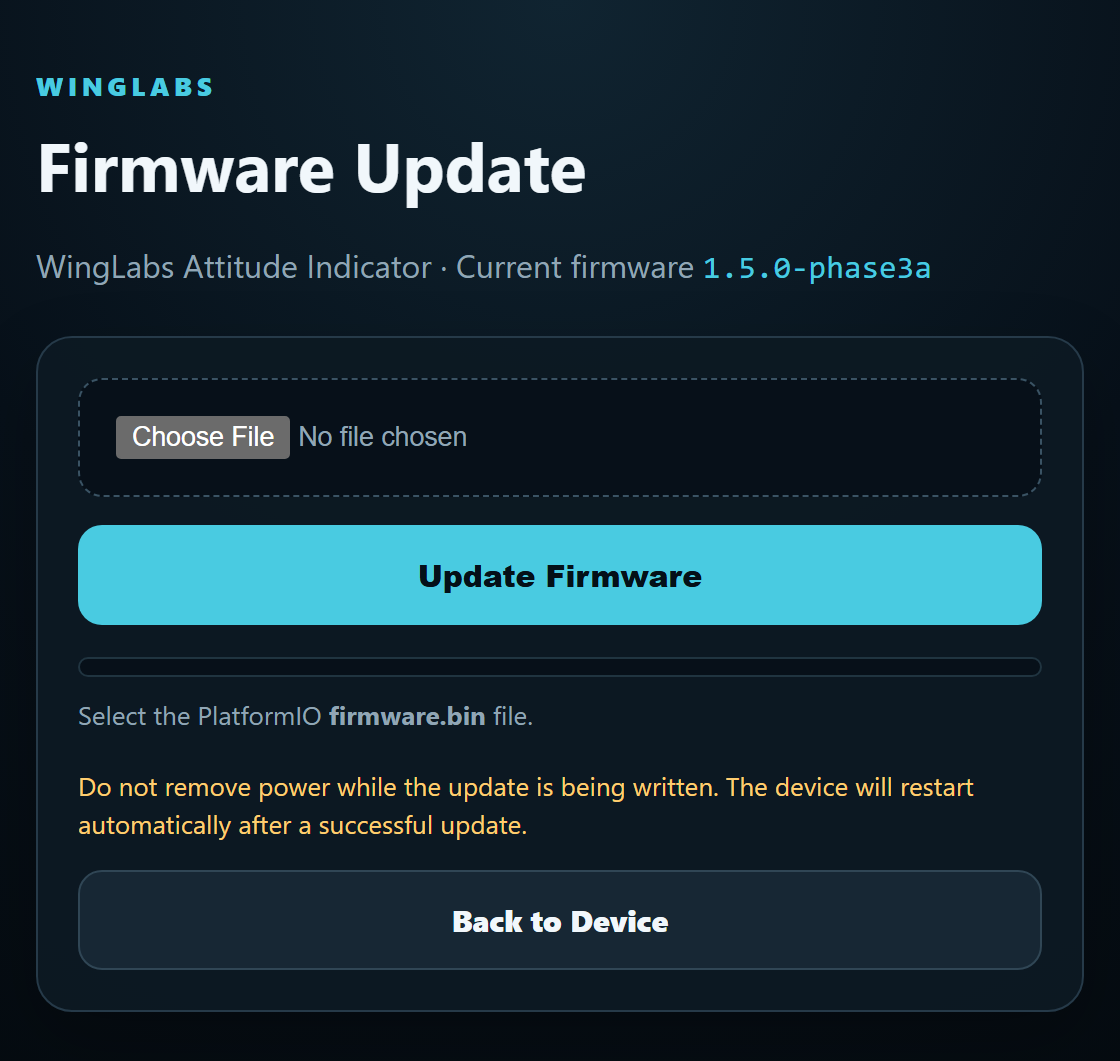
DO NOT INTERRUPT THE UPDATE
Do not switch off, move the aircraft or close the page while the update is being written. If the transfer is interrupted, the new file is discarded and the instrument starts with its current firmware; simply repeat the update.
07 · Safety and radio coexistence
- Not a certified instrument. This product is designed for radio-controlled model aircraft only. It must not be used as a navigation or flight instrument in full-size aircraft.
- Do not rely on it alone. Always fly by direct visual contact with your model and follow your local model-flying rules.
- Wi-Fi is a bench tool. The built-in Wi-Fi runs at very low power (about 7 mW) and switches off automatically as soon as the aircraft moves. Never try to use the control panel in flight.
- Check before every flight that the display reacts correctly: bank left and right and raise the nose, and confirm the horizon moves the right way and returns to level.
- Calibrate correctly. Power up only with the aircraft still and wings level. If the display does not read level on the ground before take-off, switch off and on again.
- Protect the display from impacts, moisture and prolonged direct sunlight in a closed canopy.
AUTHENTICITY
Every WingLabs instrument carries a unique serial number and a hardware-protected credential. The control panel shows AUTHENTIC for a genuine unit.
08 · Troubleshooting
| Symptom | What To Do |
|---|---|
| The display stays on CALIBRATION RETRY | The unit is detecting movement. Switch the motor off, let the aircraft rest on a stable surface and do not touch it. Calibration completes automatically. |
| The horizon is not level on the ground | The unit was moved during power-up or the offset is set. Switch off and on with the aircraft still and wings level, then check the pitch offset. |
| Level flight shows nose-down pitch | Set a positive pitch offset as described in section 05. |
| IMU LOST is shown | Power-cycle the unit. If it appears again, contact your WingLabs dealer. |
| The WingLabs Wi-Fi network does not appear | It is only available for 60 seconds after power-up and switches off when the aircraft moves. Switch off and on, keep the aircraft still and connect promptly. |
| The control panel does not open | Make sure you are connected to WingLabs, then open http://192.168.4.1 in a browser. Turn off mobile data if your phone keeps switching networks. |
| The Wi-Fi disconnects during use | The 10-minute session ended or the aircraft was moved. Switch off and on to start a new session. |
| The firmware update failed | The unit keeps running its current firmware. Reconnect, check that you selected the correct .bin file for your model and repeat the update. |
| The browser asks for a password on the update page | Enter user root and password flysafe. |
09 · Specifications
| Item | Value |
|---|---|
| Models | WL-AI-V169 vertical (portrait), WL-AI-H169 horizontal (landscape) |
| Display | 1.69 inch colour IPS LCD, 240 x 280 pixels |
| Processor | ESP32-S3 dual core, 240 MHz, 16 MB flash, 8 MB PSRAM |
| Motion sensor | QMI8658 6-axis (3-axis gyroscope, 3-axis accelerometer) |
| Displayed range | Bank +/-80 degrees, pitch +/-40 degrees |
| Readout resolution | 0.1 degree |
| Display refresh | Up to 25 frames per second |
| Start-up time | 20 to 30 seconds including calibration |
| Pitch offset | -45.0 to +45.0 degrees, stored permanently |
| Wi-Fi | 2.4 GHz access point, network WingLabs, 8.5 dBm (about 7 mW) |
| Control panel | http://192.168.4.1 |
| Wi-Fi availability | 60 s connection window, 10 min maximum, off when the aircraft moves |
| Power | 5 V (5.5 V maximum) through the servo lead, from the receiver or a BEC |
| Firmware | 1.5 (shown on the control panel) |
10 · Warranty
WingLabs warrants this instrument against defects in materials and workmanship for 12 months from the date of purchase.
What is covered
If the instrument fails during the warranty period because of a manufacturing defect, while it has been installed, powered and used as described in this manual, WingLabs will repair or replace it, at its choice, free of charge. A repaired or replacement unit is covered for the remainder of the original warranty period.
What is not covered
The warranty does not cover damage or faults caused by:
- A wrong connection, including reversed polarity or connecting the lead to anything other than a receiver channel or a BEC output as described in section 02.
- A wrong supply voltage: any voltage above 5.5 V, including 6 V, 7.4 V or 8.4 V (HV) receivers and BECs, and voltage spikes or faults of the model’s power system.
- Crashes, impacts and falls, water, moisture, heat or prolonged direct sunlight.
- Opening, modifying or repairing the unit, or any attempt to do so, by anyone other than WingLabs.
- Installing firmware that is not an official WingLabs firmware for your model.
- Use outside its purpose, which is radio-controlled model aircraft only, and normal wear or cosmetic damage.
Limitation of liability
The instrument is a visual aid for model flying only (section 07). To the fullest extent permitted by law, WingLabs is not liable for any loss of or damage to models, other equipment, property or persons, including crashes, arising from the use of the instrument, its incorrect installation, a wrong connection or a wrong supply voltage. Where liability cannot be excluded, it is limited to the purchase price of the instrument.
How to make a claim
- Contact your WingLabs dealer within the warranty period and describe the fault.
- Quote the serial number (Device ID, shown on the control panel, section 04) and keep your proof of purchase.
- Return the unit only after your dealer has confirmed how to send it.
YOUR STATUTORY RIGHTS
This warranty is given in addition to, and does not affect, the rights you have as a consumer under the law of the country where you bought the instrument.